Wednesday, January 28, 2009

Trip Report: TLC Florist and Greenhouses

There aren't a lot of great places to buy plants in my hometown of Norman, OK.  But I found a gem (actually 2 gems!) in northern Oklahoma City - just a 40 minute drive from home.  TLC Florist and Greenhouses has 2 locations in northern Oklahoma City and is everything I want in a plant store.

I first visited the north-central (Edmond) location in November and then visited the NW OKC location in early January.  The Edmond location is much larger, and has a wider selection of plants.  However, I found that the NW OKC location has plants in much more affordable sizes.  There were some really great Aglaonemas (specifically the species Lilliput) at the Edmond location that were in large pots and cost $35 a piece.  At the NW location they had some in 4" pots for $5!  I'm all about the experience of watching the plant grow.  Besides, I already don't have enough room in my house for all my plants.  So the 4" size suited me well on all levels.

According to their website, TLC has been ranked in the top 100 of US Garden Centers for the past 12 years straight!  In addition to having high quality plants, they do a local Saturday morning TV show on Gardening during the Spring.  I haven't seen it before, but I plan on tuning in some Saturday morning this Spring, now that I know it exists.  They also do free seminars on the weekends during the Spring and Summer.  They have posted the schedule to their website, for anyone in the central Oklahoma area who might be interested.

I took some pictures and posted the photo album here.  Enjoy!

Of course, I didn't walk away from TLC empty handed.  I bought 5 plants:

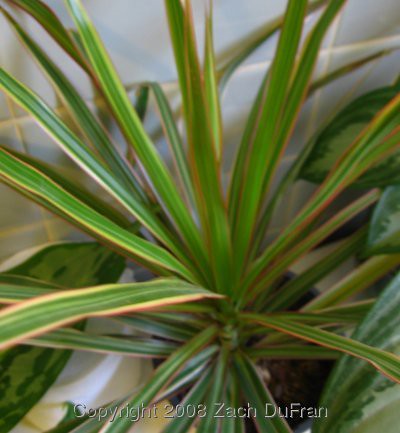
  • Aglaonema 'lilliput' - This is a very attractive Aglaonema with lance-shaped leaves that are curly like those of 'Royal Ripple' and splotched in a unique variegation.

  • Aglaonema NOID - I'm not sure what this one is and it could quite possibly be a species I already have in my collection.  But at the price of $5, I couldn't pass up the opportunity to add another Aglaonema.

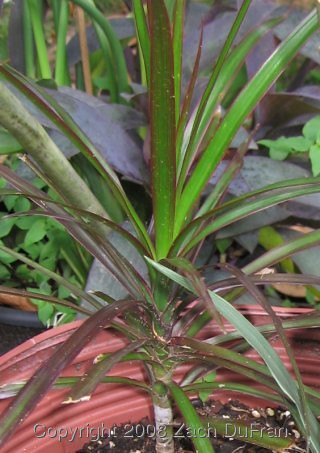
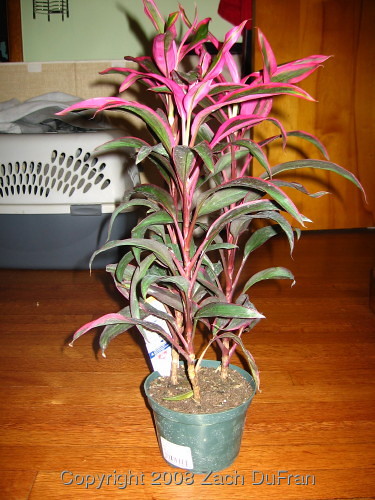
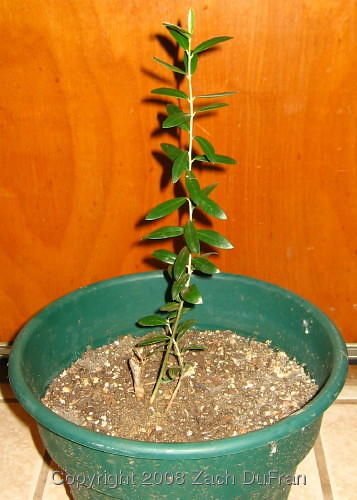
  • Philodendron 'Rojo' - This is a beautiful self-heading Philodendron with deep purple, red and green leaves.  The leaves are thick and waxy like the burgundy rubber plant (Ficus elastica 'Burgundy').  TLC had some really large plants that were way beyond my budget.  But they also some medium sized plants that were very healthy and pretty affordable.

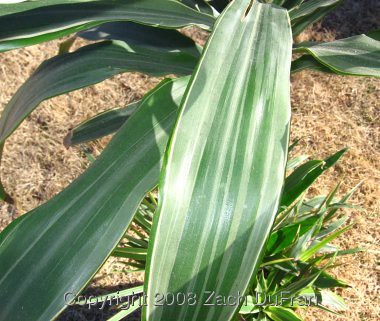
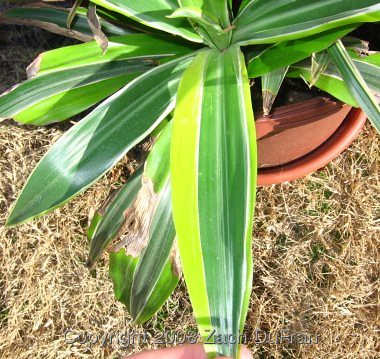
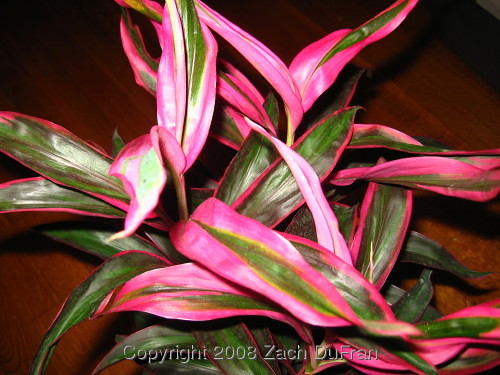
  • Ctenanthe lubbersiana - These plants were literally bursting out of their pots.  I recognized them as being in the same family as Stromanthe, Calathea and Maranta - the Prayer Plants.  The leaves of this plant are light green with broad streaks of yellowy-white.  The plants weren't marked but I was happy to see the price was minimal when I got to the checkout counter.  I have since divided and repotted this plants into two plants that look almost as large as the original.  How is that possible?

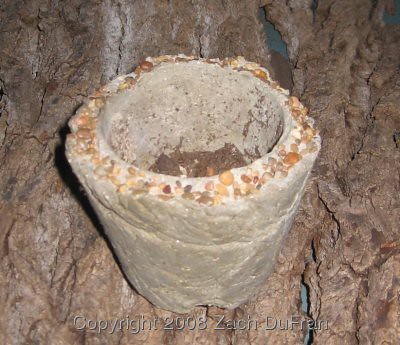
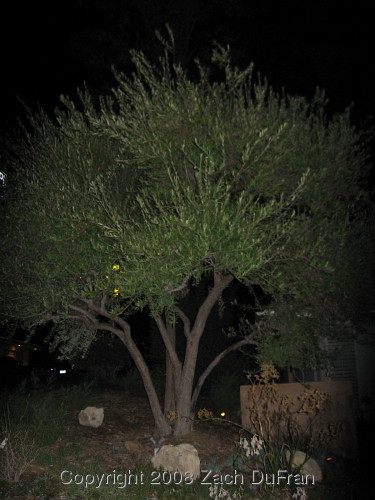
  • Platycerium bifurcatum (Staghorn Fern) - I have admired these plants for quite a while, but I have always seen HUGE specimens.  I was really excited when I saw this small specimen in a 4" pot.  I'm looking forward to mounting him on bark this summer and watching him take off.  Maybe I will even hang him from the Magnolia tree in my backyard.  I always see this hanging from trees, it seems.

To see my plants, look at the photo album.  The pictures below the break are the plants that I purchased.

Tuesday, January 27, 2009

Keeping a plant journal

My Plant Journal

Since October 2008, I have been keeping a plant journal.  I have a thing for journals and little blank books, so I had a bookshelf full of them.  My intention was to fill them with my important thoughts over the years, be it a novel, lousy sketches or a journal.  I was thinking that I really needed to start keeping track of important events concerning my plants and decided that one of my little blank books was perfect for the job.

My current plant journal is a small earth-tones journal made by Paperblanks from their "embellished manuscript" collection.  I chose the Vincent van Gough journal because of the small garden scene drawn on the front.  They also make a couple of Mozart and Beethoven journals with music on the front, as well as Rembrandt sketches and even Shakespeare's writing.  On my journal, the wrap over piece magnetically attaches to the front.  The journal measures 7"x9" and has 144 lined pages.  The pages have just the right number of lines to be spaced correctly for my handwriting.  Paperblanks makes a bunch of really cool looking journals, including some with Asian art on the covers, while others are simple leather-bound books.  I purchased mine in the gift shop of Nathaniel Hawthorne's house in New England.  But I have also seen them sold at several local book stores. :)

I have been using my journal to keep track of when I purchase new plants, where I got them and how much they cost me.  Then I track when they bloom, when I notice anything weird about my plants, when I bring them in, put them out, prune them, etc.  It has been a fun experience and I think it will prove valuable as I continue forward and wonder when certain things happened.  It is also a nice compliment to my blog.  I will write in my journal as things occur and then blog about them on a more regular (twice a week) schedule.  So, even though I took a trip to a wonderful greenhouse a couple of weeks ago, it's not going to be on my blog for a couple more weeks.  In the meantime, my journal (and my camera) will hold all of the important information that I need to remember for my blog post.

My Gardening Sketchbook

One day I wanted to sketch up a little idea for a terrarium that I wanted to plant.  But I wanted to be kind of messy and my plant journal was much too neat for this activity.  So I grabbed another journal - one of those lab books with the black and white marbled covers and gridded pages for drawing plots easily.  This journal has become my sketchbook for when I want to be messy and make plans.

anubias_sketch
Sketch of my plans for a 10 gallon Anubias paludarium
I have drawn up some plans for different terrarium and paludarium plantings, some sketches of my greenhouse plans and also made some lists of plants I would like to order.

greenhouse_sketch
Initial planning sketch for my greenhouse
These two journals are very separate things in my mind.  In my plant journal I use pencil and write pretty neatly.  In my sketchbook, I use a pen and scratch things out.  It's much more messy.  It's kind of like my two journals are for the two halves of my brain.

Do you keep a plant journal?

Friday, January 23, 2009

Desert Island Challenge

A fellow plant blogger (Shirl's Gardenwatch) issued a challenge to other plant bloggers and many (43, so far) have tackled it.  I was slow to jump on the bandwagon, but I caught the caboose.  [Imagine a bandwagon that has a caboose.]

The challenge:  If I was stuck on a desert island and could take any 3 plants with me, which plants would they be?

The details:  Forget growing requirements - any plant will survive just fine on this desert island.  Also, you don't need the plant for food or anything like that.  Just pick the plants you would want there with you.

In other words, if I could only see three plants for the rest of my days, which plants would I pick?

Of course, for anyone who likes plants this is a tough challenge.  I imagine even someone who doesn't notice plants would have trouble devising a list.

I am trying to decide whether I would want to look at some of my favorites over and over again or something that I have never kept before...  Hmm...

First, I have to choose a plant from my favorite family (Aroids).  I would choose Scindapsus pictus.  It's simply one of the most beautiful foliage plants I've ever seen - and I really like foliage plants.  I'm also a big fan of vining plants.  I'm picturing myself stuck on this island for the rest of my life, which could be a good 60-70 years, so it would be really great to see a Scindapsus pictus after 60 years of growth.

staked
one of my small Scindapsus pictus
On the other hand, I have seen some very large Scindapsus pictus and nothing really changes about them.  Beyond the leaves getting a couple inches larger in width, the plant just keeps creeping and filling more space.  They do change growth habit a little bit when allowed to climb up the surface of a tree or rocks, so I think I would have to plant my Scindapsus pictus around a tree, allowing some to climb around on the ground and other vines to creep up the tree in the "shingling" habit.

The next plant on my list will need to be a little more dynamic and changing with time.  It will need to be something that blooms or changed leaf habit as it grows.  Potential candidates include other Aroids, like Monsteras or Philodendrons.  I think I could definitely spend a lot of time looking at plants from these two genera.  And I would enjoy watching the Monsteras produce new fenestrations as they matured.  But I have already picked an Aroid, and I have grown a lot of these.  I think I would choose a plant that I don't have - a plant that would offer something new to me.

I'm going to go for a Passion flower.  There are so many brilliantly colored Passion flowers - I don't know which color I would choose.  I would probably pick one of the purple ones, but I recently saw a picture of a red one that was pretty amazing, too.

Passion flower
Passion flower - photo from herbal extracts plus
The last plant is one that just suddenly came to me.  It is a plant I have only seen a couple of times, but it was beautiful.  The Silver Russian Olive tree.  I saw a bunch of these in Boulder, Colorado when I was there last year for a conference.  I asked my coworker what they were, knowing that he had lived there a couple of years ago and must know.  He told me they were God's curse to the world.  Well, he wasn't quite that harsh, but he said they were somewhat invasive there and had spines on them.  He had volunteered to help a friend clean up their yard and remove a tree.  Apparently he came away from the experience with some wounds.

Anyway, it didn't take anything away from their appearance if you ask me.  And I won't be chopping down any trees on my desert island, so I don't expect this tree to give me any problems.

Silver Russian Olive 'Quicksilver' (Elaeagnus angusitfolia)
The trees I saw on the side of the road in Boulder were large, with thick trunks almost black in color.  It was a great contrast with the silvery, almost white, leaves.

There's my list.  It's a weird one and the plants aren't in any way a cohesive group, but who said they needed to be?  If I made a list tomorrow, it would probably be different.  There are simply too many plants that I would enjoy viewing for the rest of my days - desert island or not.

Wednesday, January 21, 2009

Book Review: Tempting Tropicals

Tempting Tropicals: 175 Irresistible Indoor Plants by Ellen Zachos is a book about tropical houseplants.  Unlike most books on houseplants, the species highlighted in this book are a little less common and some are rare or exotic.  But all of the plants can be grown indoors, they're just not necessarily easy to find.

Tempting Tropicals by Ellen Zachos

I really like the bold choices made by Zachos for this book.  She has apparently read her share of houseplant books that cover the same common species that you see in many houses.  She decided to pick out some odd balls from her years of experience growing tropical plants in a very non-tropical environment (apartment buildings in various parts of the northeast United States) and tell about her favorite plants from all of those little experiments.

Because the book does not focus on the typical houseplants, I would not recommend this book as a good reference for someone who doesn't already have a general houseplant book or two.  But for someone who already has some of those books in their library, you won't find a lot of repetition on these pages.  And if you are interested in growing something that you haven't seen before or something that will surprise your peers, this would be a great book to reference.

The first quarter of the book covers the care of tropical plants in the home environment.  Chapter topics include classification, growth information, container choice, potting media, fertilization, light exposure, artificial lighting, humidity, pruning, repotting, propagation, pest profiles, pest management and diseases.  This front quarter of the book has generally good information from someone that obviously has a lot of experience.  Though I had read much of this advice before from a number of different sources, I picked up new tips and especially gained a lot of knowledge from the section about artificial lighting options.

The remaining three-quarters of the book is occupied with plant profiles for 175 different plants, many of which I was not familiar with.  The profile tells about the physical characteristics of the plants and how to care for them.  Additionally, each plant's "winning attributes" are described.

I won't list all of the great plants in the book, but here are a couple of highlights:

Climbing Onion - Boweia volubulis - This is a unique onion plant with very delicate foliage above the large, flaky onion bulbs that sit on the soil's surface.

Peacock Plant - Calathea lancifolia - I am a lover of Calatheas anyway, and this is one of the less common ones, with lance-shaped leaves.  This plant is towards the top of my wish list.

Coconut Palm - Cocos nucifera - This is the common coconut palm tree, which looks really cool as a specimen tree, because the stalk of the tree grows directly out of the coconut.  I have twice tried growing this plant in my house and it simply will not survive in my low-light conditions.

Sealing Wax Palm - Cyrtostachys renda - This is a really intriguing plant.  It looks just like a palm tree with bright red stems that are waxy looking (as the name implies).

Elephant's Foot - Dioscorea elephantipes - This plant reminds me a lot of the climbing onion (above).  It has a large above-ground base, in this case not a classic onion but more of a hard sphere of wood.  The upper growth of the plant has wandering branches with small roundish leaves.  It is a true oddball.  I hope to run across one of these someday.

Butterwort - Pinguicula ehlerserac x. P. oblingoloba - This little plant has bright lemony-green leaves with tall stalks of dainty magenta blooms.  Apparently this is a very easy plant that grows rapidly and likes a lot of water.

The plants are alphabetized by genus name and many times there are a couple of species covered under each genus.  At least one picture accompanies each genus in the profiles.  There is a lot of variation in plants described in the book - from colorful, showy blooms to beautiful foliage plants to spiky cacti.

There is a final, short section with some miscellaneous topics, including traveling with plants, bark mounting and summering plants outdoors.

As I said, this book is for the person who already has some experience with growing the typical houseplants (and already has a couple of books in that department).  It is for someone who is ready to try something new and maybe venture in to the world of ordering something rare, exotic and outlandish (maybe even from a foreign country) and growing it in your own home.

Monday, January 19, 2009

Hypertufa pots

About a year and a half ago, I bought some supplies for making my own potting soil and I also bought a bag of cement so that I could try my hand at making some hypertufa pots.  There is quite a bit of information on making hypertufa pots out there on the internet.  And there are quite a few recipes, as well.

Why make your own pots?Let me count the reasons...  There are quite a few reasons for making your own pots.
1. They aren't expensive to make.  And pots can be expensive to buy.
2.  It's a fun project, if you have the time.
3.  Hypertufa pots act a little differently than clay or plastic.  They can soak up water from a tray.  Also, if you want, you can get moss and lichen to grow on the pot, itself.

I took on the hypertufa pots for the fun of the project.

What do you need?There are three main ingredients: (Sphagnum) Peat Moss, Vermiculite and (Portland) Cement.  I use approximately equal parts of each to make my pots.  I use a little more cement than the other ingredients.  [For those who might already have peat moss and cement on hand, but don't want to go and buy vermiculite, I've heard that sand is a good substitute.]  And you will need some sort of container for mixing your ingredients.  I use an empty 5 gallon paint bucket and a paint stir stick for mixing.

You will also need some items for making molds for your pots.  Here is where you can be very creative - or not.  I have heard that cardboard boxes of varying sizes make good molds.  [Make sure that you use a sturdy cardboard, not the thin paperboard that is used for items like cereal boxes.]  You can place one cardboard box inside of another one and fill the space between to make your pot.  Or you can use pots of varying sizes.  Another method is to fill some large container with sand and make a mold with the sand.  Then you can pour your mixture into the sand, using some other container (maybe a bowl or pot) to act as the inner barrier.  Sounds rather vague, doesn't it?  Hopefully you get the idea.

Sometimes it is hard to remove the finished product from the mold, so I suggest using materials that you don't mind cutting apart when all is said and done, in order to retrieve your pot.  This is one of the reasons for using the sand mold method.  Also the sand mold gives you much more flexibility in shape and size of the pot you want to make.

Shapes and sizes
Most of the hypertufa containers I have seen are normal small to medium pot sizes.  However, I have seen some larger planters and in one case a sort of fountain that had attached pots.  I have considered sculpting some interesting shapes, and I have tried one very ambitious project - but it failed miserably.  That will probably be the subject of a future post.  If you need inspiration, do a google search on "hypertufa pots" and you are likely to find quite a few pictures.

How do you do it?First, you'll want to make sure you have the 3 necessary ingredients, a container for mixing them (I suggest a 5 gallon bucket), a mixing stick (paint stir stick will do) and your mold containers.  Also, most people would tell you to use gloves.  If you don't use gloves the cement will prune your fingers in a matter of seconds and you'll be rather dried out when you're finished.  I have also had some peeling fingers a couple of days after working with hypertufa, which my wife finally linked to not using gloves.  I don't really mind it and I mind gloves a lot more, so I don't use gloves.  But don't say I didn't warn you.

Combine the ingredients and be sure the peat moss is broken up before adding water.  Add water and mix to a smooth but not runny consistency.  The amount of water is pretty easy to gauge.  If the consistency is crumbly, add water.  If the mixture is really runny, you've got too much water and need to add some more of each of the 3 ingredients (or just let it sit and dry out for a little bit).  Then you can just go for it, pressing or pouring your mixture into the mold.  Make sure that there are no air pockets.

Leave your project in the sun to dry for at least a day.  The curing process actually takes a couple of days, but it will be firm enough after about a day to remove the moldings around the pot and allow better air circulation to all surfaces.  If you are not able to easily remove the moldings by hand, carefully cut them away so that you don't put much stress on the newly created pot.  It will need to sit outside of the mold for another day to dry out a little more and become more solid.  IMPORTANT: Don't forget to make some drainage holes in your pot.  For a couple of mine, I was using pots as molds, so I was able to create drainage holes by poking through the drainage holes of my molds while my hypertufa was still in the mold.  For other projects, just carefully create the holes as soon as you remove the pot from its mold.  It should still be soft enough to use a toothpick.  If you forget, you can always use a drill later - carefully.  Whether a toothpick or a drill, be careful not to shatter your creation!

My Pots

small_hypertufa
small hypertufa pot I made
For the small pot above, I used two "disposable" square plastic pots that I had on hand.  I wasn't sure how easy it would be to remove the pot once it was dry, so I lined the inside of the larger pot with a plastic grocery bag first.  It turns out, that step was very helpful when it comes to removing the pot from the mold.  However, the drawback is that you can see all the little wrinkles from the sack on the side of the pot.  I guess it could be considered an artistic touch - if I said that I had intended the effect.  You decide whether you like it or not.

david_and_pot
slightly larger hypertufa pot - and David
You might notice the pot above has considerably smoother sides than my first pot.  For this one, I just used two square pots and did not do any lining.  Unfortunately I actually had to cut the outer pot into pieces to remove it from my finished pot.  I "broke the mold."  I guess if I ever wanted to make a matching pot it wouldn't be hard to find an identical mold.

hyper_rocks
Smaller pot with pebbled edge
The most creative I got in my original batch of hypertufa pots was to add some pebbles to the edge of this round pot.  It's kind of sloppy looking, but it has character, so I like it.

And beyond...

My future plans include a rectangular planter (maybe 20" by 30" and 12-15" high).  These are often called "troughs."  I will probably use two cardboard boxes as the mold for this.

It seems that there are a lot of creative plant people.  And the really creative ones have done all sorts of neat things with hypertufa.

I have heard that you can get moss and/or lichen to grow on the side of your hypertufa pots by coating them in a mixture of one ground moss and one of the following: beer, buttermilk or yogurt.  Before you try too hard, consider whether moss grows in your area of the country at all.  If it doesn't you're going to have a hard time getting moss to grow on your hypertufa.   If you really want to do this, it can happen.  If you live in the Pacific Northwest, it will happen - whether you want it to or not.  (so I'm told)

Another cool thing you can do with hypertufa is imprint the side of your pots with leaves (or other objects of your choosing).  To make this work, a fine mixture of hypertufa is needed.  You probably need to use sand in place of vermiculite and also really strain the peat moss so that no chunks make it into the mixture.  Before water is added the mixture should be powder-like.  And it helps to use leaves with big veins, which will show up clearly in an imprint.  I think I'm going to have to try this soon!

Want more information on hypertufa?  There is an entire forum dedicated to Hypertufa on GardenWeb.  There are people that frequent that forum with a lot of experience and helpful advice.  Also, doing a google search on "hypertufa" will result in about 75,000 hits!  That should give you enough to read for a while.

Wednesday, January 14, 2009

Plant photo directory

I have already written about the MyFolia website, which is a wonderful plant networking community.  The single most enjoyable aspect of MyFolia was one that I initially underestimated - the photos of my plantings.

When I first started building my catalog on MyFolia, I found that most of the plants I have in my collection were not in the database of MyFolia.  Since the MyFolia database of plants is created by the users, I attribute the missing plants to the group of people who have used MyFolia so far.  I would gander that many of them are traditional "gardeners," which (to me) means that they grow vegetables and flowers and things in their yards.  I consider myself more of a "plant enthusiast" and "plant collector."  For me, the gardening side is a small fraction of my plant hobby.  Most of my plants reside in pots and most must live half the year indoors.  Another portion of my plants reside in my aquariums.  So far not a single one of my aquatic plants was already in the MyFolia database.

So from the get-go, I was having to add each one of my plants to the database, as well as to my list of plantings.  I give great credit to the developers of MyFolia, because this was an easy and quick task.  But as I was focused on adding the correct genus and species names for all of my 160+ plants, I neglected to invest any time in uploading pictures.  Besides, MyFolia requires you to upload pictures to a photo-sharing community (Flickr, PicasaWeb or a couple of other options).  Since I didn't already have an account, I put that task on the back burner.

It was just a couple of days later before I decided I should probably open a Flickr account so that I could post some of my plant pictures to MyFolia.  Boy, am I glad I did.  My "Plantings" (what MyFolia calls your list of plants) is now a wonderful photo directory of the plant list that I also have listed here on The Variegated Thumb.  The MyFolia developers were pretty smart in using an existing photo sharing community, because they can just show a snapshot from Flickr, without having to store the pictures on their own servers.  The only downside is that to see the full picture, you must click the link and go to the Flickr website.

On LibraryThing (a website for book lovers - very similar to MyFolia), you can look at your "Library" (book collection) in list form or cover form.  I found that it was really fun to look at all the books I have read in cover form.  I thought this would also be a really cool feature for my plant collection, to see the little uploaded snapshots of my "plantings" (analogous to my "library" on LibraryThing).  I have written the developers to suggest this feature for MyFolia, so we'll see what happens.

So, the cool thing is that I have been thinking about taking a picture of every plant in my collection and building a photo album of my plants, to accompany My Plant List page on this blog.  But the problem with that method is updating the photo album would be a hassle.  Using MyFolia will be much easier to add a new plant and a new picture, so the work is done for me already.  Check out my plantings on MyFolia here.

Also, MyFolia has a Wish List, which is just like my "Plant Wants" page.  So I have started transferring my Plant Wants list to MyFolia, as well.

Monday, January 12, 2009

My Dracaena Forest

I purchased my first Dracaena (Dracaena marginata) a couple of years ago.  It was one of those small pots at Wal-Mart with 3 or 4 shoots in it.  I think I divided them up in as many other pots and let them grow with some other plants.

About a year later my mother-in-law was so kind as to give me her mature (about 4 foot tall) half-dead Dracaena deremensis ‘Warneckii.’  There wasn't really anything wrong with it except that it had been sitting in a sunny window and not watered for a month or two.  After a little bit of care and some shadier conditions it popped out rather nicely and even grew two new shoots from the soil.  I was pretty excited about that, because I know that you can "fill out" a Dracaena by chopping it's head off and letting multiple shoots grow from the top of your cut.  But I hadn't done any unnecessary chopping and new plants were growing.  I decided to add my Dracaena marginatas from their various locales to my newly acquired, no longer half-dead Dracaena.  This pot was starting to look lush and full.

dracaena_starts
Dracaena deremensis ‘Warneckii’ shoots (foreground) and Dracaena marginata (left rear)
dracaena_forest
My Dracaena collection - posed in the front yard for lighting purposes.
It wasn't long before I saw another color variety of the Dracaena deremensis ‘Warneckii’ - the lemon lime variety, which has yellow where the other has white.  Of course, I bought the pot of small starts and added them to the potted Dracaena forest, as well.

warneckii
close-up of Dracaena deremensis ‘Warneckii’ leaf
lemon_lime
close-up of Dracaena deremensis ‘Warneckii Lemon Lime’ leaf
And soon I found what looked like another color variation of my original Dracaena marginata.  Whereas the D. marginata has an overall dark green and red coloration, this variety was lighter, with some pink and white.  Now that I have researched the plant a little, I think it is actually Cordyline australis 'Pink Stripe.'  This really surprises me, because it looks just like my Dracaena marginata, except for color.  What surprises me even more is that the genera Dracaena and Cordyline are not even in the same botanical family.  How can this be!?!  I hope the botanical gods can forgive me for tainting my "Dracaena Forest" with a Cordyline...  The good news is that Dracaena australis is a synonym for Cordyline australis, which basically means that the Cordyline which I mistook for a Dracaena is commonly mistaken as such.  Dracaena australis is not a valid botanical name, but at least others have seen the same likeness and note it's odd botanical placement in the Cordyline genus.  Not all flora and fauna fall into the neat little categories that mankind tries to use for them.

[Update:  Mr Subjunctive assures me this new plant is also a Dracaena - not a Cordyline - just as I had suspected.  The plant is probably Dracaena marginata 'Bicolor.'  I shall have to change my plant listing.]

marginata
Dracaena marginata
cordyline_stripe
Cordyline australis 'Pink Stripe', which looks like a Dracaena to me.  Another Dracaena marginata variety - possibly D. marginata 'Bicolor'
Just a week ago I came upon another variety, Dracaena reflexa 'Anita,' which looks just like the two above, except that it is solid green.  The plant was 4 separate stalks about 3 feet tall in a large pot and selling for just $3.  Of course I bought it and plan to move the shortest of the 4 plants into my Dracaeana forest planting.

reflexa
Dracaena reflexa 'Anita'
I would like to add maybe one more color variety to this somewhat crowded pot, but I haven't found the right one yet.  I was thinking there was a dark red solid Dracaena available, but I haven't found one since I took on this project.  It could be that it was a mislabeled Cordyline that I saw.  I'll have to keep my eyes open.

Thursday, January 8, 2009

Plant Find: Ti plant

A couple of years ago my (lucky) parents went on vacation to Hawaii.  They returned with two cane cuttings for me to try and start.  The first plant was a Plumeria, which grew quite easily (after a slow start) from it's cutting.  The other plant was a Ti plant (Cordyline), which did not grow and eventually rotted, I believe.  My mom brought back one of each for herself as well and had the same luck as I did.  Ever since, I have looked admiringly at Ti plants, wondering "what if...?"

cordyline_tall
My new Ti Plant - Cordyline sp.
Usually Lowe's gets Ti Plants during the summer season and has them in big 8-12" pots for $10-20 a piece.  Never wanting to spend that much money, I haven't bought one before.  But just recently I ran across a 6" pot at Lowe's with three separate shoots of Ti plant for only $3.99.

cordyline_foliage
Cordyline foliage coloring (pink, green and dark green/red)
I think this plant is probably a different species from the cane cutting brought back from Hawaii, since the stalk of this plant is much smaller.  But it could just be that this is a younger plant.

I haven't been able to get a correct species ID on this plant yet.  The leaves are much more slender than the common Cordyline terminalis and Cordyline fruticosa.  Maybe all that will change with maturity, though.

Any ideas?

Tuesday, January 6, 2009

My LA Olive

My father-in-law is an amateur bicyclist who has taken on a couple of tough cycling challenges.  During the fall of 2007, he decided to bike across the country, starting on an Atlantic beach in Virginia and finishing on a Pacific beach in Los Angeles, California 45ish days later.  He also biked part of the Tour de France, but this post is not about that trip.

While my father-in-law was biking across the country, my mother-in-law spent each day driving their RV to their next stop.  She would pave the way and setup camp for the night.  When my father-in-law arrived at the campsite, he would eat, crash (sleep) and then get up to do it all over again.  [Of course, on a cross-country cycling trip, there were a couple of non-sleeping crashes too.   At least one of those left a mark.]  At some point, he actually reached water again in California.

My wife, her brother, his girlfriend and I flew to California as a surprise, to see my father-in-law finish his cross-country expedition.  We greeted him at the Santa Monica pier when he arrived on his bike the final day.  We stayed a couple of extra days in LA at my wife's uncle's house so as to make a little trip of the outing.  Living in LA, he has all sorts of great things growing in his yard that simply cannot be grown year-round outdoors in Oklahoma.

There are a number of Bird of Paradise planted along his house and a beautiful olive tree in the front yard.  He also has orchids sitting out on his porch in the shade.  They apparently love the weather and are very low maintenance for him.  [I have never dared to put any of my orchids outside.]  Before leaving I noticed there were some young saplings coming up around his olive tree.  My mother-in-law and I dug up a couple of them and she brought them back home to Oklahoma in the RV.  They were each about 8 inches tall I would say.

olive_dad
The parent tree to my little olive.  I took this picture on a different trip to LA, remembering that I needed a picture of the "daddy" tree.  Unfortunately I was only there at night, so this lousy picture will have to do for my sapling's inspiration for now.
So now I have a celebrity olive tree.  Why a celebrity?  Well, because it's from LA.  I feel like I should knock before entering the room where I keep it.  And I probably should water it a little more frequently.  In fact, for a celebrity, it should have a much fancier pot.  Okay, forget the whole celebrity thing - it's just an olive tree.

After traveling to Italy during the summer of 2007, I have had great admiration for olive trees and their splendidly silver leaves.  I had been thinking that I would like to have a specimen of my own.  I knew I would have to keep mine in a pot, since it would freeze out here in the winter.  But I figured I could grow it the way that many people grow ficus trees as specimen trees in pots.  At some point it would reach about 6 foot in height and look really nice.  I never imagined I would dig up a little olive tree for free.

However, my promising little olive tree has not grown very quickly.  I think maybe olive trees are normally slow growers, but I'll be well into my 40's before my specimen reaches a respectable (non-embarrassing) height.  [By the way, I'm currently 26.]  For now I will just have to post his puny picture on the internet so that anyone in the world can see him and laugh at his puniness.  How's that for motivation!?!

olive_small
My puny little olive sapling.  The short, wide stem to the left is the original plant.  It promptly died and new shoots arrived from the roots.
One day (crossing my fingers) he will become large and strong like his father (the top pictured olive tree, not me) - and hopefully not be lopsided. :)

Monday, January 5, 2009

Plant find: Anthurium

I have admired the genus Anthurium for quite a while.  I remember the first one I saw and thought that it must be a peace lily with a magenta bloom.  Little did I know, this wasn't one of those painted plants like the glittery blue or purple Poinsettias you sometimes see around Christmas.  It didn't take long before I started seeing Anthuriums everywhere.  I've found most plants to be that way.

There seems to always be several of these plants at Lowe's, but they are usually priced near $10 and because of their persistent availability, I have kept them on my "to-purchase-one-day" list, rather than my "must-buy-today" list.  I think I officially became an Aroid collector in October, when my collection grew to more than 40 plants.  With Anthuriums being one of the Aroid genera, it would only be a matter of time before I would own one... or two... or three...

Recently I made a return at Lowe's and received a giftcard with about $12 credit.  I promptly went to see what plants would be coming home with me.  Lowe's had the usual 2" houseplants from Angel Brand (which I really enjoy).  They also had some great orchids in bloom, but I haven't had much luck with orchids lately.  And, as usual, they had 4 or 5 Anthuriums in bloom (for about $8).  I took a look at them and decided - today is the day!

anthurium_full
My new Anthurium
My Anthurium is marked as Anthurium amnicola. [Update: The label was incorrect, as this is not the species A. amnicola.] It has magenta colored inflorescences and shiny dark green leaves.

I have been reading Deni Brown's book "Aroids: Plants of the Arum Family," in which there was a good overview of the variation of vein patterns (venation) of Aroid leaves.  At one point, it was mentioned that in some particular genera, the veins do not reach from the primary vein (midrib) to the edge of the leaf.  Instead, there is a separate vein that runs parallel to the leaf edge that "catches" all of the veins from the midrib.  My new Anthurium demonstrates this unique venation. [Here is a really good guide for leaf characteristics.  And more information here.]

anthurium_veins
Anthurium venation
"Is this rare?" you ask.

No, I don't think so.  In fact, there are some very common plants and trees that have this "collection" vein.

"Does it have a purpose?"

I don't know.  Probably.  I can't imagine that it wouldn't have a purpose.

"Well, why did you mention it?"

I don't know.  But it is an interesting subtlety of this plant that I observed and thought I would pass it along.


Now that I have one species of Anthurium, I have to get more.  It's the official law of collectors.  One is not enough.  I already have my eyes set on another species, which I saw at the Oklahoma City Myriad Gardens.  [Check out all of these color varieties.]

img_8794
Pale purple Anthurium at the OKC Myriad Gardens

Friday, January 2, 2009

Planty Networking

I became a life-time member of LibraryThing about 6 months ago after finding that I could spend hours on the website and that it was worth the $25 for my continued enjoyment.  LibraryThing is a great website for keeping track of what you read, what you plan on reading, what books you own, etc.  It also has all of the fun networking tools (like facebook and similar networking sites), if you care to use them.  You can join groups about Dickens or gardening books or dystopian fiction - whatever you like.  I primarily use LibraryThing to keep track of which books I have read and which ones I am going to read.  I started thinking it would be wonderful if there was a similar site for the community of plant enthusiasts.  It would be a website that allowed you to catalog your entire collection of plants and do similar things as far as networking.

Well, not finding that kind of community online, I decided to catalog all of my plants on my own.  You can see them by clicking the My Plants tab at the top of this page.  [Note: This no longer exists now that I have moved my blog to blogspot.]

Thanks to Fern at Lifeonthebalcony.com, I found that there actually is such a site as I had been dreaming of!  The bad news is that I will now be wasting loads of time on said site...

As soon as I told my wife about MyFolia, she said "Goodbye, husband!  I loved you once..."

MyFolia.com is a wonderful new networking/cataloging website for plant enthusiasts.  This site has it all!  You can catalog all of your plants; keep track of when you planted them; keep a journal on important events like blooming, fruiting, etc.; join groups of like-minded planty people; get information or give tips to other users; share plant pictures; and even swap seeds or plant starts with other users.  I think one of the main draws of the website is the journal aspect, although I am not sure whether I will use that tool or not.  I just started keeping a plant journal a couple of months ago and so far I am enjoying the aesthetic aspect of keeping the journal.  While I use a keyboard for most things, I don't think it will be an adequate substitute for my plant journal.

Another great networking website that I have recently joined is Blotanical.  The most basic explanation of Blotanical is that it is a directory of gardening/plant blogs.  But it is really so much more than that.  It also has some nice networking tools, where you can add friends and fave blogs.  The nicest tool of Blotanical is that you can read the most recently updated blog posts from the blogs registered on Blotanical.  You can see the listing as a whole, or only those that you have chosen as your favorites.  Also, Blotanical has a point system where you are rewarded by your activity on the site with increased privileges.  I have found myself on the "most active users" list a number of times and The Variegated Thumb has benefitted from the exposure.

In fact, prior to finding Blotanical, The Variegated Thumb had about 2 readers - my mom and myself.  That's pretty lame.  But since then, I have drawn something like 1200 unique visitors from 50 different countries.  Some people just stop by once, but others continue to read my blog and give me some feedback.  Even though I maintain the Variegated Thumb for my own enjoyment, having someone read my blog really makes it fun.

So, if you're a "planty" person, I suggest you check out MyFolia, and if you are a "planty" blogger, I suggest you check out Blotanical.  Both are great websites!