About a year and a half ago, I bought some supplies for making my own potting soil and I also bought a bag of cement so that I could try my hand at making some hypertufa pots. There is quite a bit of information on making hypertufa pots out there on the internet. And there are quite a few recipes, as well.
Why make your own pots?Let me count the reasons... There are quite a few reasons for making your own pots.
1. They aren't expensive to make. And pots can be expensive to buy.
2. It's a fun project, if you have the time.
3. Hypertufa pots act a little differently than clay or plastic. They can soak up water from a tray. Also, if you want, you can get moss and lichen to grow on the pot, itself.
I took on the hypertufa pots for the fun of the project.
What do you need?There are three main ingredients: (Sphagnum) Peat Moss, Vermiculite and (Portland) Cement. I use approximately equal parts of each to make my pots. I use a little more cement than the other ingredients. [For those who might already have peat moss and cement on hand, but don't want to go and buy vermiculite, I've heard that sand is a good substitute.] And you will need some sort of container for mixing your ingredients. I use an empty 5 gallon paint bucket and a paint stir stick for mixing.
You will also need some items for making molds for your pots. Here is where you can be very creative - or not. I have heard that cardboard boxes of varying sizes make good molds. [Make sure that you use a sturdy cardboard, not the thin paperboard that is used for items like cereal boxes.] You can place one cardboard box inside of another one and fill the space between to make your pot. Or you can use pots of varying sizes. Another method is to fill some large container with sand and make a mold with the sand. Then you can pour your mixture into the sand, using some other container (maybe a bowl or pot) to act as the inner barrier. Sounds rather vague, doesn't it? Hopefully you get the idea.
Sometimes it is hard to remove the finished product from the mold, so I suggest using materials that you don't mind cutting apart when all is said and done, in order to retrieve your pot. This is one of the reasons for using the sand mold method. Also the sand mold gives you much more flexibility in shape and size of the pot you want to make.
Shapes and sizes
Most of the hypertufa containers I have seen are normal small to medium pot sizes. However, I have seen some larger planters and in one case a sort of fountain that had attached pots. I have considered sculpting some interesting shapes, and I have tried one very ambitious project - but it failed miserably. That will probably be the subject of a future post. If you need inspiration, do a google search on "hypertufa pots" and you are likely to find quite a few pictures.
How do you do it?First, you'll want to make sure you have the 3 necessary ingredients, a container for mixing them (I suggest a 5 gallon bucket), a mixing stick (paint stir stick will do) and your mold containers. Also, most people would tell you to use gloves. If you don't use gloves the cement will prune your fingers in a matter of seconds and you'll be rather dried out when you're finished. I have also had some peeling fingers a couple of days after working with hypertufa, which my wife finally linked to not using gloves. I don't really mind it and I mind gloves a lot more, so I don't use gloves. But don't say I didn't warn you.
Combine the ingredients and be sure the peat moss is broken up before adding water. Add water and mix to a smooth but not runny consistency. The amount of water is pretty easy to gauge. If the consistency is crumbly, add water. If the mixture is really runny, you've got too much water and need to add some more of each of the 3 ingredients (or just let it sit and dry out for a little bit). Then you can just go for it, pressing or pouring your mixture into the mold. Make sure that there are no air pockets.
Leave your project in the sun to dry for at least a day. The curing process actually takes a couple of days, but it will be firm enough after about a day to remove the moldings around the pot and allow better air circulation to all surfaces. If you are not able to easily remove the moldings by hand, carefully cut them away so that you don't put much stress on the newly created pot. It will need to sit outside of the mold for another day to dry out a little more and become more solid. IMPORTANT: Don't forget to make some drainage holes in your pot. For a couple of mine, I was using pots as molds, so I was able to create drainage holes by poking through the drainage holes of my molds while my hypertufa was still in the mold. For other projects, just carefully create the holes as soon as you remove the pot from its mold. It should still be soft enough to use a toothpick. If you forget, you can always use a drill later - carefully. Whether a toothpick or a drill, be careful not to shatter your creation!
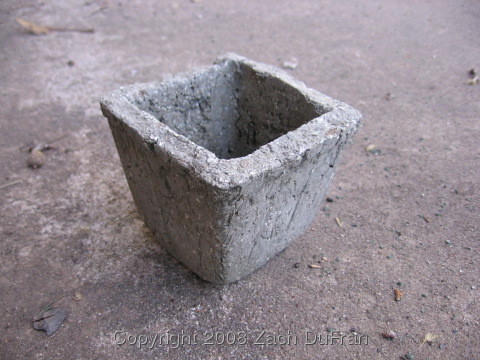
My Pots
For the small pot above, I used two "disposable" square plastic pots that I had on hand. I wasn't sure how easy it would be to remove the pot once it was dry, so I lined the inside of the larger pot with a plastic grocery bag first. It turns out, that step was very helpful when it comes to removing the pot from the mold. However, the drawback is that you can see all the little wrinkles from the sack on the side of the pot. I guess it could be considered an artistic touch - if I said that I had intended the effect. You decide whether you like it or not.
You might notice the pot above has considerably smoother sides than my first pot. For this one, I just used two square pots and did not do any lining. Unfortunately I actually had to cut the outer pot into pieces to remove it from my finished pot. I "broke the mold." I guess if I ever wanted to make a matching pot it wouldn't be hard to find an identical mold.
The most creative I got in my original batch of hypertufa pots was to add some pebbles to the edge of this round pot. It's kind of sloppy looking, but it has character, so I like it.
And beyond...
My future plans include a rectangular planter (maybe 20" by 30" and 12-15" high). These are often called "troughs." I will probably use two cardboard boxes as the mold for this.
It seems that there are a lot of creative plant people. And the really creative ones have done all sorts of neat things with hypertufa.
I have heard that you can get moss and/or lichen to grow on the side of your hypertufa pots by coating them in a mixture of one ground moss and one of the following: beer, buttermilk or yogurt. Before you try too hard, consider whether moss grows in your area of the country at all. If it doesn't you're going to have a hard time getting moss to grow on your hypertufa. If you really want to do this, it can happen. If you live in the Pacific Northwest, it will happen - whether you want it to or not. (so I'm told)
Another cool thing you can do with hypertufa is imprint the side of your pots with leaves (or other objects of your choosing). To make this work, a fine mixture of hypertufa is needed. You probably need to use sand in place of vermiculite and also really strain the peat moss so that no chunks make it into the mixture. Before water is added the mixture should be powder-like. And it helps to use leaves with big veins, which will show up clearly in an imprint. I think I'm going to have to try this soon!
Want more information on hypertufa? There is an entire forum dedicated to Hypertufa on GardenWeb. There are people that frequent that forum with a lot of experience and helpful advice. Also, doing a google search on "hypertufa" will result in about 75,000 hits! That should give you enough to read for a while.
Why make your own pots?Let me count the reasons... There are quite a few reasons for making your own pots.
1. They aren't expensive to make. And pots can be expensive to buy.
2. It's a fun project, if you have the time.
3. Hypertufa pots act a little differently than clay or plastic. They can soak up water from a tray. Also, if you want, you can get moss and lichen to grow on the pot, itself.
I took on the hypertufa pots for the fun of the project.
What do you need?There are three main ingredients: (Sphagnum) Peat Moss, Vermiculite and (Portland) Cement. I use approximately equal parts of each to make my pots. I use a little more cement than the other ingredients. [For those who might already have peat moss and cement on hand, but don't want to go and buy vermiculite, I've heard that sand is a good substitute.] And you will need some sort of container for mixing your ingredients. I use an empty 5 gallon paint bucket and a paint stir stick for mixing.
You will also need some items for making molds for your pots. Here is where you can be very creative - or not. I have heard that cardboard boxes of varying sizes make good molds. [Make sure that you use a sturdy cardboard, not the thin paperboard that is used for items like cereal boxes.] You can place one cardboard box inside of another one and fill the space between to make your pot. Or you can use pots of varying sizes. Another method is to fill some large container with sand and make a mold with the sand. Then you can pour your mixture into the sand, using some other container (maybe a bowl or pot) to act as the inner barrier. Sounds rather vague, doesn't it? Hopefully you get the idea.
Sometimes it is hard to remove the finished product from the mold, so I suggest using materials that you don't mind cutting apart when all is said and done, in order to retrieve your pot. This is one of the reasons for using the sand mold method. Also the sand mold gives you much more flexibility in shape and size of the pot you want to make.
Shapes and sizes
Most of the hypertufa containers I have seen are normal small to medium pot sizes. However, I have seen some larger planters and in one case a sort of fountain that had attached pots. I have considered sculpting some interesting shapes, and I have tried one very ambitious project - but it failed miserably. That will probably be the subject of a future post. If you need inspiration, do a google search on "hypertufa pots" and you are likely to find quite a few pictures.
How do you do it?First, you'll want to make sure you have the 3 necessary ingredients, a container for mixing them (I suggest a 5 gallon bucket), a mixing stick (paint stir stick will do) and your mold containers. Also, most people would tell you to use gloves. If you don't use gloves the cement will prune your fingers in a matter of seconds and you'll be rather dried out when you're finished. I have also had some peeling fingers a couple of days after working with hypertufa, which my wife finally linked to not using gloves. I don't really mind it and I mind gloves a lot more, so I don't use gloves. But don't say I didn't warn you.
Combine the ingredients and be sure the peat moss is broken up before adding water. Add water and mix to a smooth but not runny consistency. The amount of water is pretty easy to gauge. If the consistency is crumbly, add water. If the mixture is really runny, you've got too much water and need to add some more of each of the 3 ingredients (or just let it sit and dry out for a little bit). Then you can just go for it, pressing or pouring your mixture into the mold. Make sure that there are no air pockets.
Leave your project in the sun to dry for at least a day. The curing process actually takes a couple of days, but it will be firm enough after about a day to remove the moldings around the pot and allow better air circulation to all surfaces. If you are not able to easily remove the moldings by hand, carefully cut them away so that you don't put much stress on the newly created pot. It will need to sit outside of the mold for another day to dry out a little more and become more solid. IMPORTANT: Don't forget to make some drainage holes in your pot. For a couple of mine, I was using pots as molds, so I was able to create drainage holes by poking through the drainage holes of my molds while my hypertufa was still in the mold. For other projects, just carefully create the holes as soon as you remove the pot from its mold. It should still be soft enough to use a toothpick. If you forget, you can always use a drill later - carefully. Whether a toothpick or a drill, be careful not to shatter your creation!
My Pots
 |
| small hypertufa pot I made |
 |
| slightly larger hypertufa pot - and David |
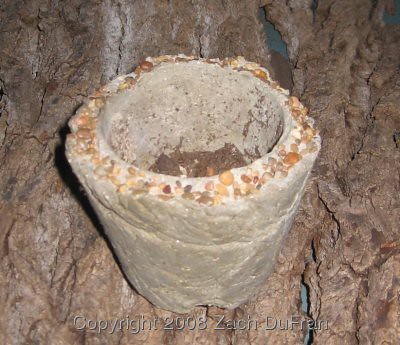 |
| Smaller pot with pebbled edge |
And beyond...
My future plans include a rectangular planter (maybe 20" by 30" and 12-15" high). These are often called "troughs." I will probably use two cardboard boxes as the mold for this.
It seems that there are a lot of creative plant people. And the really creative ones have done all sorts of neat things with hypertufa.
I have heard that you can get moss and/or lichen to grow on the side of your hypertufa pots by coating them in a mixture of one ground moss and one of the following: beer, buttermilk or yogurt. Before you try too hard, consider whether moss grows in your area of the country at all. If it doesn't you're going to have a hard time getting moss to grow on your hypertufa. If you really want to do this, it can happen. If you live in the Pacific Northwest, it will happen - whether you want it to or not. (so I'm told)
Another cool thing you can do with hypertufa is imprint the side of your pots with leaves (or other objects of your choosing). To make this work, a fine mixture of hypertufa is needed. You probably need to use sand in place of vermiculite and also really strain the peat moss so that no chunks make it into the mixture. Before water is added the mixture should be powder-like. And it helps to use leaves with big veins, which will show up clearly in an imprint. I think I'm going to have to try this soon!
Want more information on hypertufa? There is an entire forum dedicated to Hypertufa on GardenWeb. There are people that frequent that forum with a lot of experience and helpful advice. Also, doing a google search on "hypertufa" will result in about 75,000 hits! That should give you enough to read for a while.
I made two hypertufa pots years ago and love them. Although what I thought would be large turned out to be rather small. I made shallow ones to tuck in the planting beds and fill with succulents. Great instructions!
ReplyDeleteHey Zach,
ReplyDeleteNow you have me very curious! I might just try these- I love experimenting- and growing moss on the outside sounds perfect! I live in OR, so moss is my friend! That reminds me, where are you located?
Happy Gardening from Blunders with shoots, blossoms 'n roots
I'm inspired, and your "sloppy" version with the pebbles has so much character. I've seen them around but never had paid them that much attention until I'd read your nicely detailed post. I have several concrete pots around the house, but they weigh so much when they get beyond tabletop size.
ReplyDeleteThanks for all the info.
ReplyDeleteI used your instructions to make two bird baths with my summer child care group. The finished products were GREAT!!!
They look wonderful as accents in our flower and vegetable gardens.
Thanks so much!
Sharon